
Adam Horsman
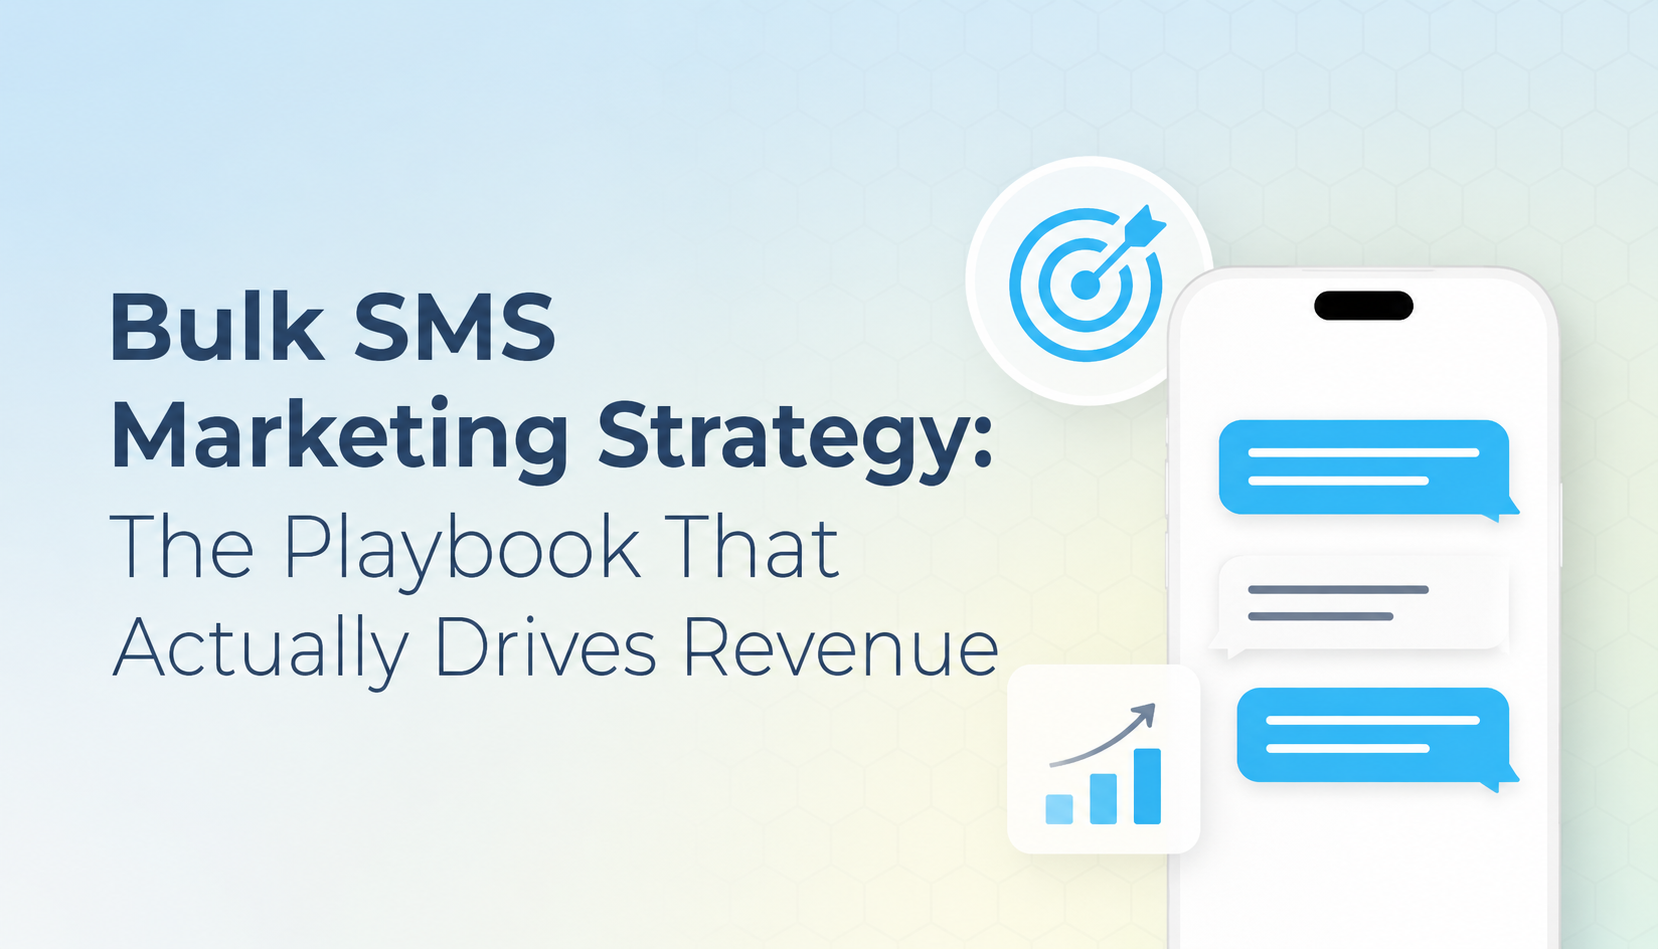
SMS Campaigns | How-To Guide | HubSpot | Hubspot Drip Campaign
SMS drip campaigns, also known as automated text campaigns , are a powerful tool in the world of SMS marketing. Text message drip campaigns are a set of automated marketing text messages that are sent out on a schedule or based on triggering events. Generally, drip marketing campaigns will send new messages every few days.
Based on the customer’s interaction with the message, different actions can be taken based on a set of predefined rules.
Now, creating an SMS drip campaign might seem overwhelming, but it doesn’t have to be. Let us guide you step-by-step on how to craft an effective text message drip campaign in HubSpot using Sakari from the ground up.
For this, you’ll need a HubSpot account and a Sakari account. Don’t have Sakari yet? No worries, you can kickstart your SMS marketing success with a free trial of Sakari today.
What is an SMS Drip Campaign?
Drip marketing campaigns are automated messages that allow you to give people the right information at the right time. As we mentioned earlier, drip campaigns are generally sent on a specific timeline, or based on a trigger event.
You may send out a series of SMS messages before an upcoming sale, or when a new user signs up for your service. In each example, the message sent will come from a prepared list of already written text messages (often in a template form), and the entire process is automated.
How Do You Create a Drip Campaign?
Creating an SMS drip campaign requires text message marketing software. In our example below, we’ll walk through the process of creating a new campaign using HubSpot. During the creation, we need to define 4 things:
-
Who will receive your message? Will it be based on a trigger event (like signing up to a form), manual enrollment, or will all your contacts receive your drip message? You need to set up the rules which will define your audience.
-
What will your messages say? This is where you get to write your script, often using templates that allow for a personal touch, making each message feel like it’s tailor-made.
-
When will your messages be sent? This is the time delay between when each message is sent. Whether it’s days, hours, or minutes apart, these intervals can make all the difference in engagement.
-
What happens when your contacts respond to your message? Depending on your contacts response, you may want to take different actions. Using a set of “if-this-then-that” rules, you may stop the drip campaign entirely, or send a different set of messages.
How to Setup a HubSpot Drip SMS Campaign
TL;DR
To set up SMS automated drip campaigns in HubSpot, you must:
- Get Started with Your Accounts
- Craft Your New Workflow
- Choose Your Workflow Type
- Name Your Workflow
- Set Triggers and Actions
- Craft Your First Message
- Personalize Your Message
- Design Your Campaign Flow
- Implement Delays and Conditions
- Finalize Your Workflow
- Activate Your Campaign
- Enroll Contacts
Here’s a step-by-step guide to master texting automated campaigns with HubSpot and Sakari, ensuring your messages always hit the mark. Let’s break it down into manageable steps:
Step 1: Get Started with Your Accounts
To kick things off, you’ll need two key accounts:
-
HubSpot Account: Don’t have one yet? No worries! Start for free at HubSpot.
-
Sakari Account: This is our go-to for sending and receiving those crucial drip texts. Sign up for a free trial at Sakari.
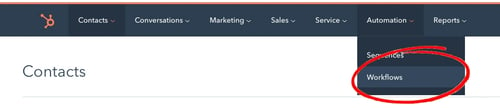
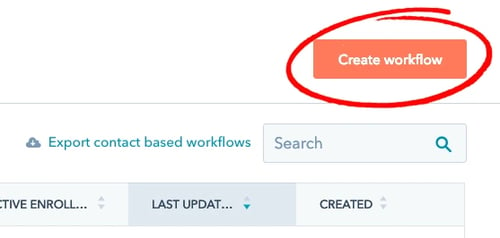
Step 2: Craft Your New Workflow
After logging into HubSpot, go to Automation > Workflows, then hit “Create Workflow” to begin your adventure.
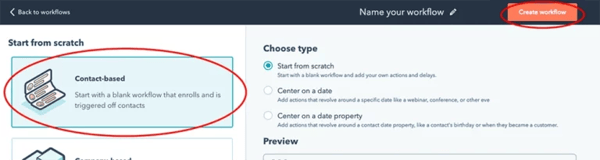
Step 3: Choose Your Workflow Type
We’re going to be sending the drip text messages to contacts, so select the “Contact-based” option. Select “Contact-based” and “Start from scratch,” then proceed by creating your workflow.
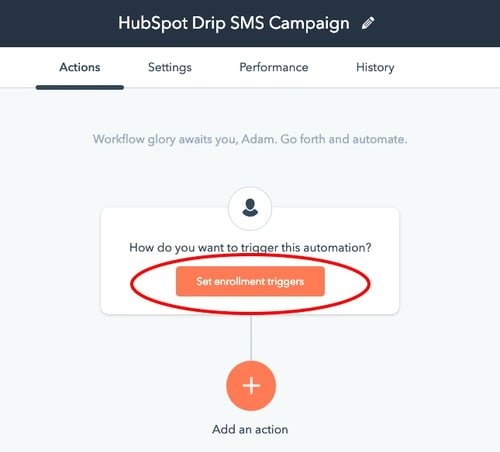
Step 4: Name Your Workflow
Give your workflow a name that resonates with its purpose, like “HubSpot Drip SMS Campaign”. Next, click the “Set enrollment triggers” button.
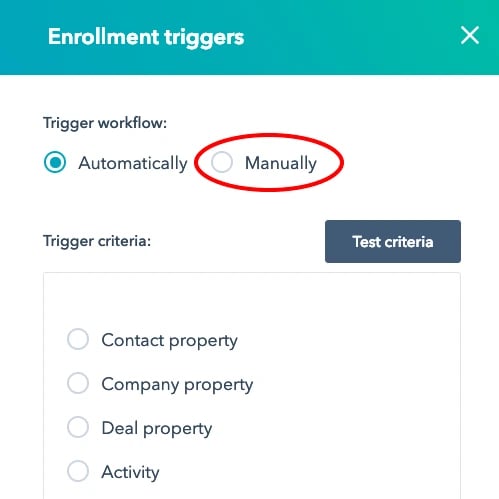
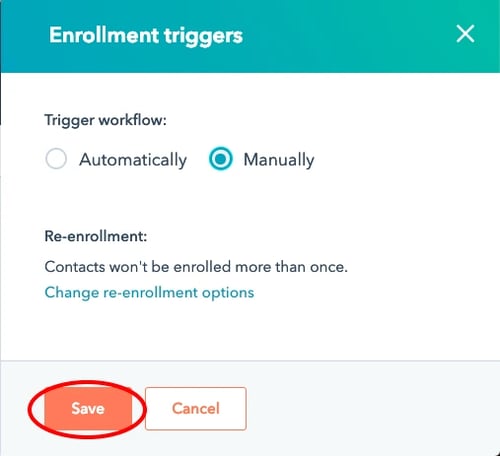
Step 5: Set Triggers and Actions
Workflows in HubSpot have triggers and actions. Triggers are what will initiate the workflow to start. Actions are what happens (sending a text message in our example).
In our example, we are going to manually trigger our workflow, so we will select the “Manually” radio button option.
Alternatively, we could also select Automatically. By selecting automatically, whenever the trigger criteria are met, the contact will be auto-enrolled in the workflow. A common example of this may be to auto-enroll a contact in a HubSpot drip SMS campaign when they complete a form or are added as a new lead.
Click “Save” to proceed.
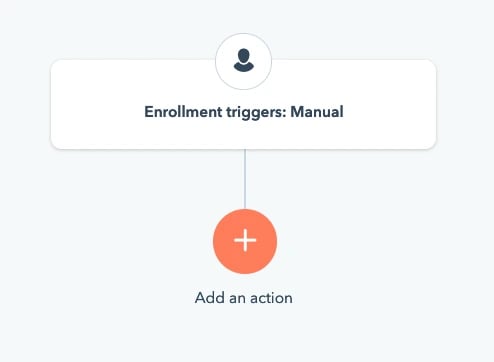
Step 6: Craft Your First Message
Now we’re ready to configure the first drip text message. Click the orange “+” Add an action icon in the workflow timeline. This will open the Choose an Action window. Scroll to the bottom and select the Sakari Send SMS integration button.

Step 7: Personalize Your Message
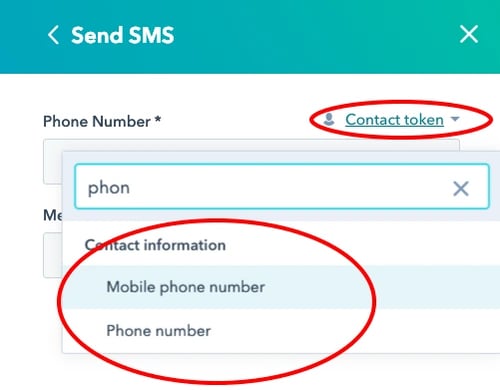
Now we will define what field will be used as the send-to phone number. This is generally going to be your contact’s “Mobile phone number” field in HubSpot.
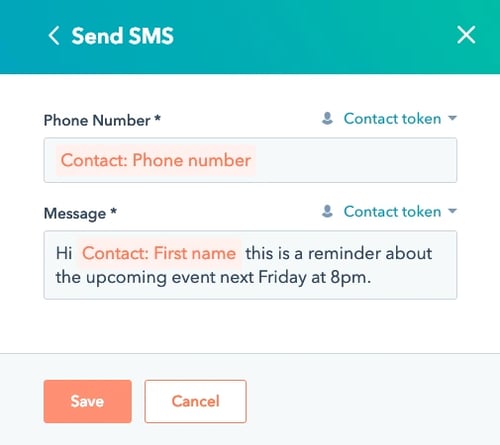
Phone Number Selection
This is the phone number that the drip text message will be sent to.
You can either manually type a phone number, which we don’t recommend, or use a contact token. By selecting the “Contact Token” button in the top right, you can then have the contact phone number automatically populated.
If you choose to use a contact token phone number, there are two default phone attributes in HubSpot: Phone Number and Mobile Phone Number. Select the option based on where your company/team populates customer mobile phone numbers.
The phone number field used must correspond with your HubSpot Sakari integration phone number.
Message Creation
Now we’ll configure the text message that will be sent. You can use a combination of static as well as token (dynamic) fields. The token fields will automatically insert contact attributes into your message. This allows you to create a personal text message using a single SMS template.
In our example, we will select “First name” from the contact token drop-down field list.
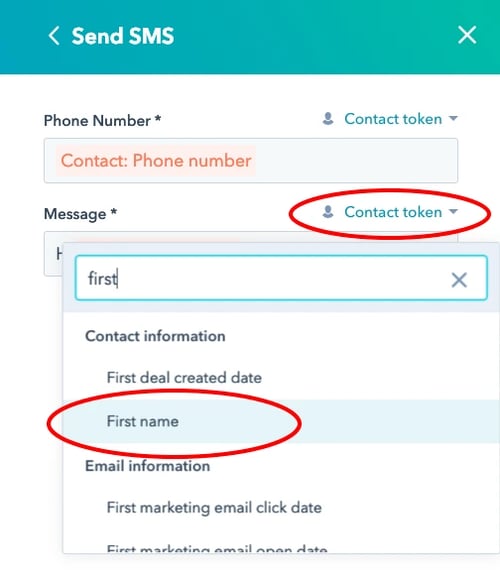
Completed SMS Message Template
This template will automatically insert the contact name into each message.
Step 8: Design Your Campaign Flow
Now that you’ve set up the first text message, we will create the drip text messaging flow. A typical structure for a drip texting flow is: message, delay > conditional statement > message.
Here is how we’ll structure our HubSpot drip SMS workflow:
- Text message #1: Send the first text message.
- Delay: Add a delay of whatever duration you desire. This delay can be specified in days, hours or minute increments.
- If/then: Add a conditional if/then statement. This will stop the drip campaign if a contact replies.
- Text message #2: Send the second text message. Another round of delay and if/then rules will then follow any additional messages.
- Delay: Add a delay of whatever duration you desire. This delay can be specified in days, hours or minute increments.
- If/then: Add a conditional if/then statement. This will stop the drip campaign if a contact replies.
- Text message #3: Send the second text message. Another round of delay and if/then rules will then follow any additional messages.
Step 9: Implement Delays and Conditions
Between messages, set delays to ensure your contacts aren’t overwhelmed. Use if/then branches to adapt the campaign based on responses.
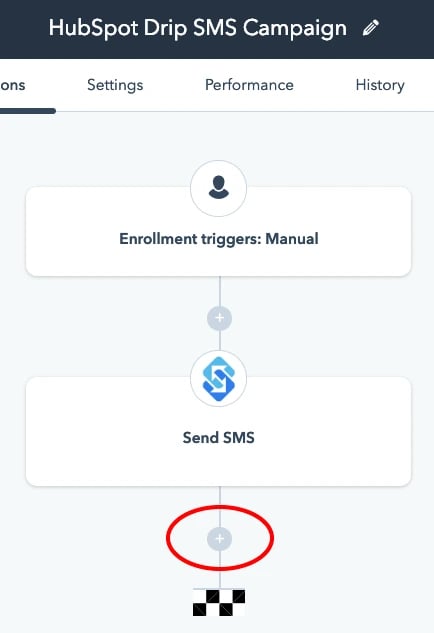
The delay will be applied between each message so that the messages will not be received simultaneously. We will add a delay measured in some days. After the first drip message is sent, the contacts will be queued until this delay has been completed.
Click the “+” icon below the “Send SMS” step to add your delay.
Select “Delay” as a building block.
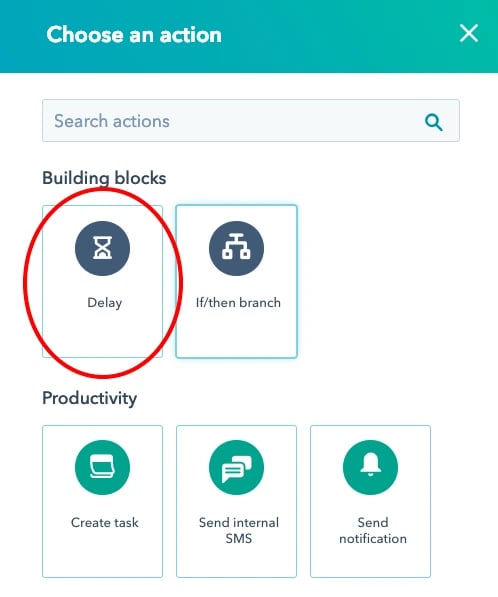
Define your delay duration (usually measured in days).
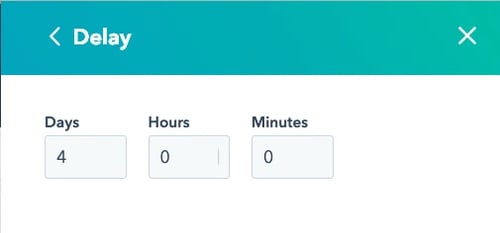
The drip workflow with delay was added.
Step 10: Finalize Your Workflow
Continue adding messages, delays, and conditions, following the structure to create a comprehensive and responsive SMS drip campaign.
Now we will add a conditional “If/then” branch. This step is not required but is recommended. By adding a conditional branch, we can stop sending text messages to anyone who has replied to our messages.
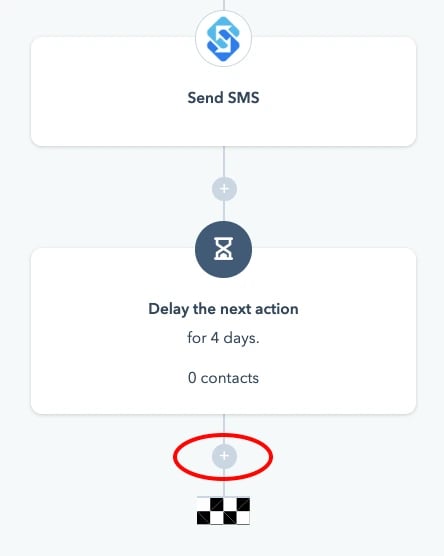
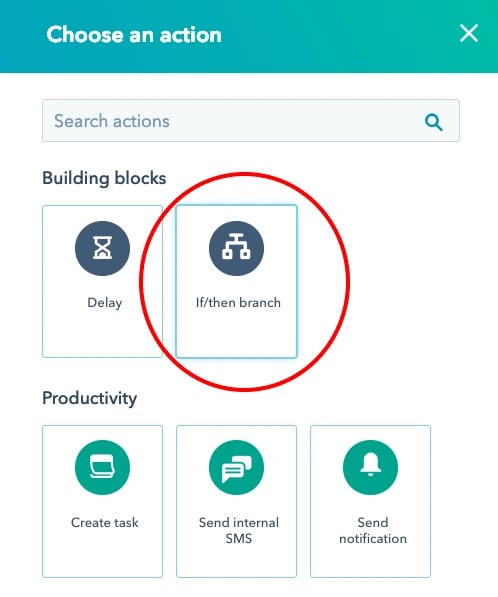
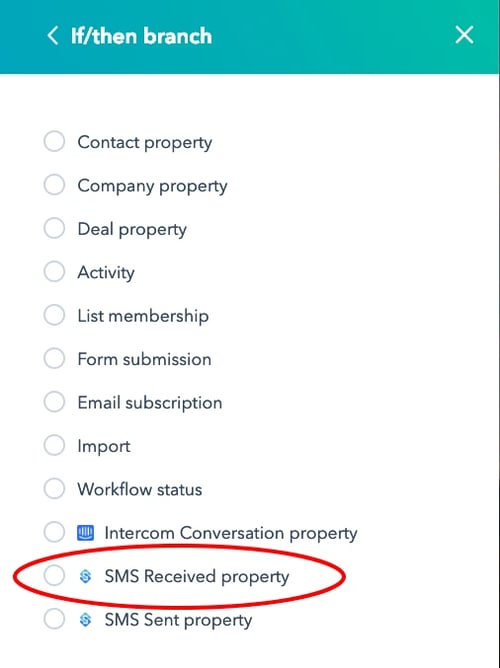
Add If/then Branch
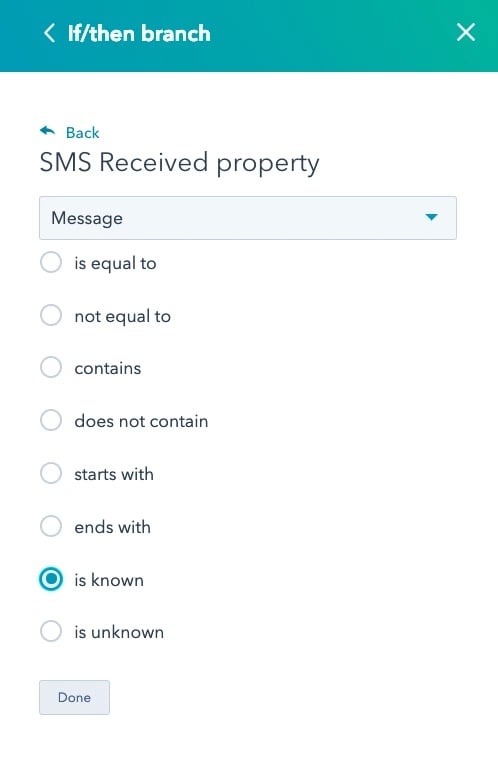
After selecting “If/then branch” as a building block, we need to define what our branch will be based on. In our example, we want to stop sending drip messages to anyone that has replied, so we will select “SMS Received property.”
We will select where the Message is known.
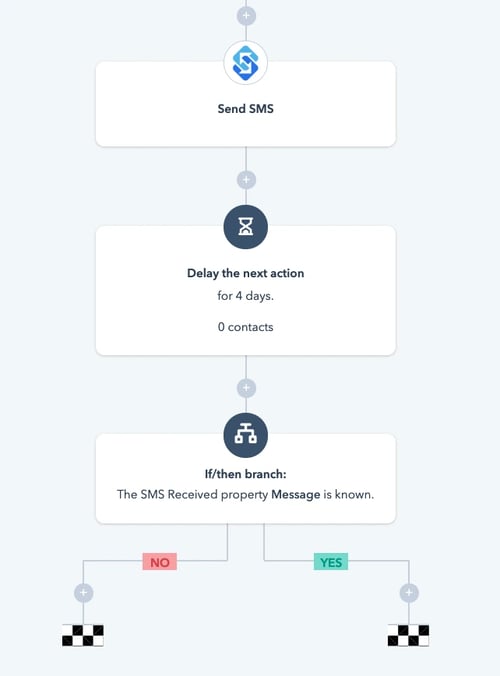
The drip messages flow with the first message, the delay and a conditional if/then statement added.
Step 11: Activate Your Campaign
Using the steps defined above, we will continue to add the rest of our drip text messages to the workflow. The structure is SMS message, delay, conditional statement, repeat. In each case, we will follow the “No” path in the workflow, where contacts have not replied to our text messages.
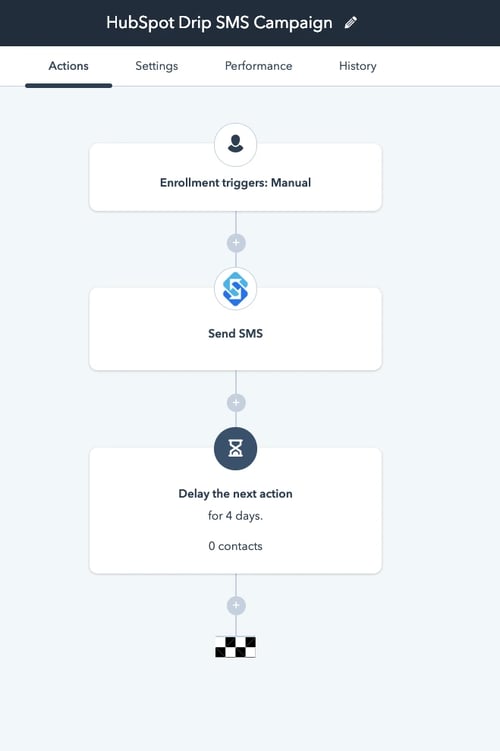
The completed HubSpot drip text messaging workflow is displayed in the image below. The workflow will begin based on manual enrollment, which we will discuss in Step #9 below. Each of the steps are outlined by day in the bullet points below. It’s important to note that multiple contacts can be in a workflow at once, each at different steps of the flow.
Drip SMS Steps by Day
-
Day 1: Contact(s) are added to the workflow and will immediately receive drip text message #1
-
Day 5: A delay of 4 days occurs. Contacts that received the first message will reviewed in the “if/then” statement. If they have responded to the drip message, they will be removed from the workflow and no longer receive any more text messages. If they haven’t responded then they will receive send second drip text message.
-
Day 9: A second delay of 4 days occurs. All contacts that received the second text message will be reviewed. If they respond to the second text message then they will be removed from the workflow and no longer receive any more text messages. If they haven’t responded to any texts, then they will receive the third and final drip message.
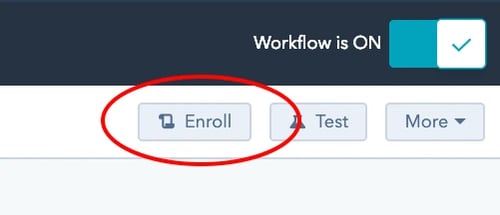
Once you’re satisfied with the setup, turn your workflow on and get ready to engage your target audience like never before.
Review Workflow

Click Workflow On

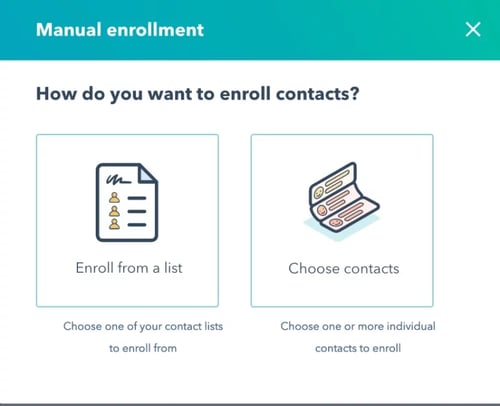
Step 12: Enroll Contacts
Now we’re ready to add some contacts to our workflow. Choose how you’ll add contacts to this campaign – either enrolling them from a list or selecting individuals manually.
Manual Workflow Enrollment Options
First, select the “Enroll” button in the top right. Because we selected manual enrollment when we first set up our drip messaging campaign, we have two options: enrolling from a list or choosing contacts.
Enrollment options:
- Enroll from a list: use a dynamic or static list to enroll contacts in the drip SMS campaign.
- Choose contacts: select one or more contacts individually to enroll in a workflow.
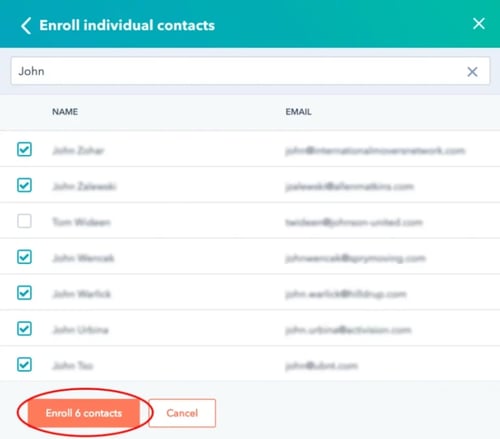
In our example, we will choose the “Choose contacts” option. This will allow us to manually assign contacts to our workflow.
Add Drip Messaging Contacts
Select the contact(s) you want to enroll in your HubSpot drip text messaging campaign. Click the “Enroll” button and your messages will begin to send out.
And there you have it – your guide to creating a dynamic and effective HubSpot Drip SMS Campaign, designed to keep your audience engaged and informed at every step.
Unlock the Power of Automated SMS Campaigns in HubSpot with Sakari
With Sakari's integration with HubSpot, you can enhance your marketing strategies by automating your text message campaigns. Start your free trial with Sakari now, get a free phone number, and use your 10 texts to explore the effectiveness of SMS drip campaigns.
HubSpot SMS Drip Campaign FAQ
-
Can HubSpot do SMS marketing?
Absolutely! HubSpot enables SMS marketing and allows you to connect with your contacts via text messages efficiently. To elevate your SMS marketing strategy, consider integrating Sakari with HubSpot. Sakari’s seamless integration allows you to leverage the power of SMS within your HubSpot campaigns, offering a robust platform to engage your audience effectively. Start your free trial with Sakari today and discover the synergy between SMS marketing and HubSpot’s dynamic capabilities.
-
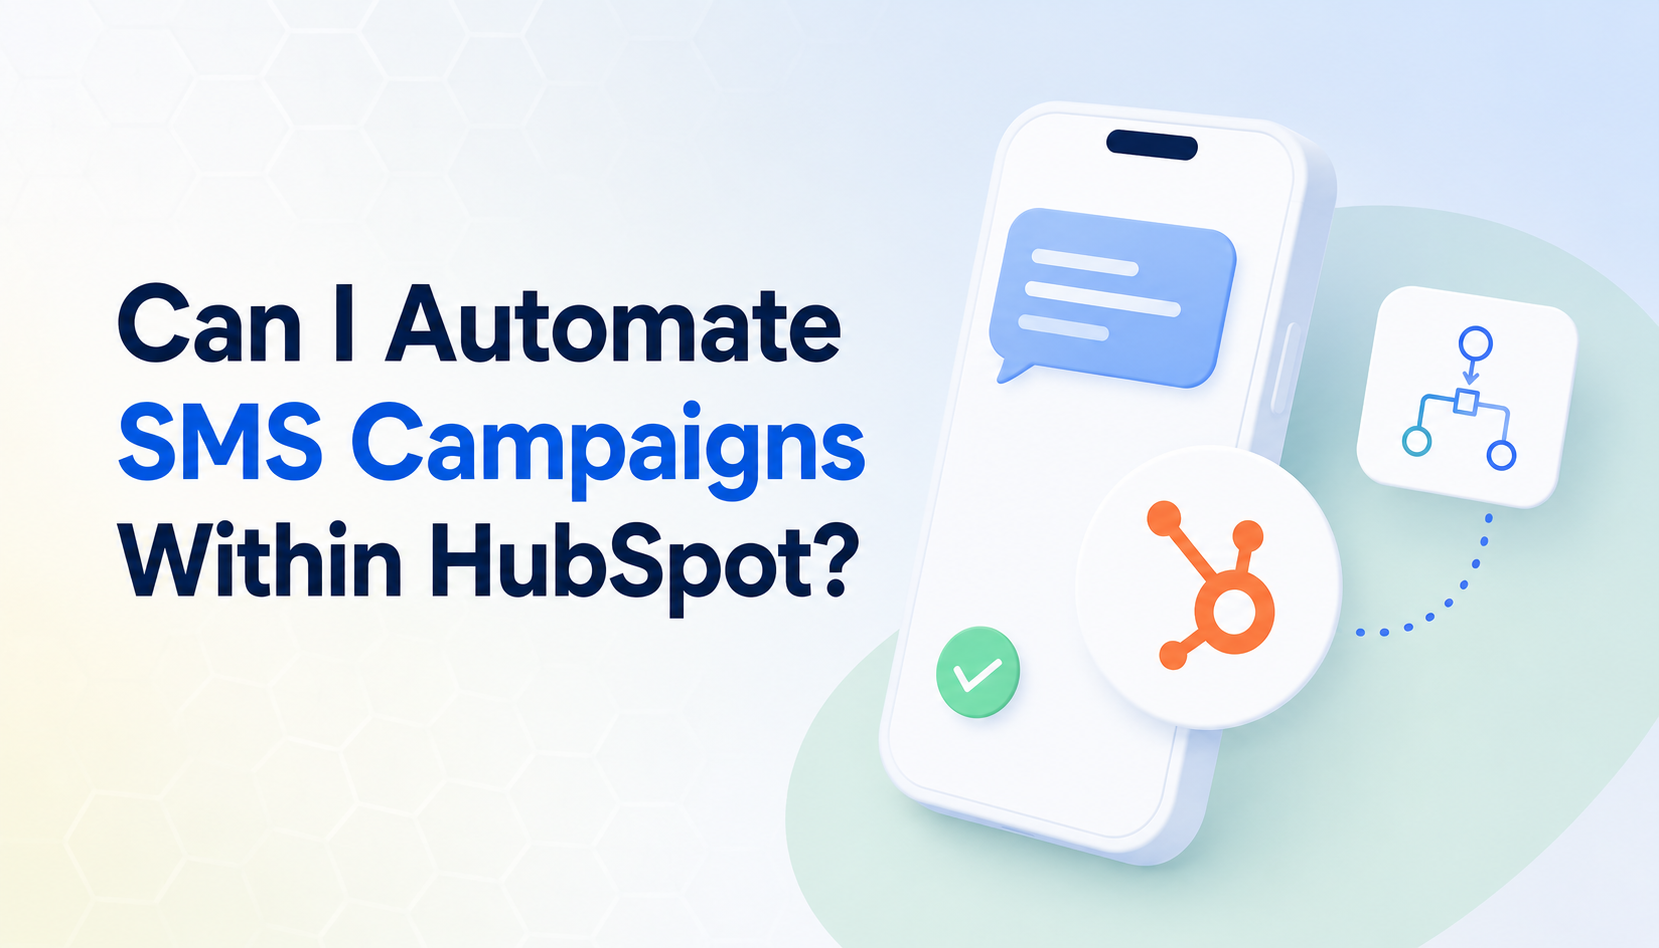
Can you automate texts in HubSpot?
Yes, HubSpot allows you to automate your text messaging, making it easier to engage with your customers proactively. To unlock this feature, you’ll need the SMS Access add-on in HubSpot. By integrating Sakari with HubSpot, you can streamline your SMS automation, ensuring timely and relevant communication with your audience. Start your free trial with Sakari today and automate your text messaging effortlessly!
-
How effective are SMS campaigns?
SMS campaigns offer an impressive read rate of 95% within just three minutes of delivery. This is a testament to the power of text message marketing. By integrating Sakari with HubSpot, you can harness this effectiveness, crafting SMS campaigns that resonate with your audience and drive engagement. Start your free trial with Sakari today and experience the potent combination of SMS marketing’s effectiveness and HubSpot’s comprehensive campaign management tools.
-
Can you send bulk SMS from HubSpot?
Yes, with Sakari’s integration, you can send bulk SMS directly from HubSpot. Whether you’re announcing a new product, sharing a special offer, or sending updates, Sakari’s integration with HubSpot empowers you to execute your bulk SMS campaigns seamlessly. Start your free trial with Sakari today and explore how you can enhance your HubSpot experience with the ability to send bulk SMS effortlessly.
-
Is SMS marketing more effective than email?
Yes, SMS marketing has the potential to outperform email marketing, boasting an impressive open rate of 98%. This high engagement level means that your audience is more likely to read and interact with your SMS messages compared to emails. Start leveraging the power of SMS marketing with Sakari and HubSpot today, and see how this dynamic duo can elevate your marketing efforts. Start your free trial with Sakari today!
You might also like


Award-winning performance